
Update on the forge shifter for anyone who maybe interested. After setting the gap on both cables to 1.8mm I found the change was sticky going from 5th to 4th gear, it didn't slot over to the 3rd/4th gear plane cleanly, I was getting frustrated now and decided to get stuck in and really look at the issue, ever since I installed the short shifter the changes, although shorter were not smooth in acion and felt notchy and lacking in feel, if you know what I mean.
I studied the workshop manual and finally worked out the adjustment method, there are two ways to achieve this, one involves removing the floor console completely and using an U shaped piece of steel with one of the U legs being much shorter than the other. It needs to be about 4.5mm diameter, you put the gearbox in 4th gear, the tool then slides into holes in the shifter mechanism to lock the shifter and selector actuators in position. Once done head over to the gearbox end and release the cables from the box, slide the spring down the cable and pop out the pink clip leaving the cable adjustment completely loose, (easier to do if you press on the reverse side of the pink clip with a finger to release it) then just pop them onto their pins and press the pink clip in, slide the spring back over and job done.
The PDF shows the U shaped adjusment tool, in section 7 of the PDF.
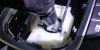
The way I did it was to pop off the gear lever gaiter and use a 4.5mm drill bit to lock the lever into 4th gear position, I've attached a couple of pics to show what I mean. Then do the same procedure explained above with the cable end adjustment. The cable tie around the drill bit is in case I drop it.
The idea is that with the gearbox in 4th and the lever locked into 4th position the cables should be adjusted so the they drop onto the linkage without effort and then are locked into position.
I've now removed the forge shifter and reverted to the OEM linkage and the change has never been sweeter, the drill bit method takes minutes to do once you've exposed the gearbox cable ends by removing the battery, ECU and battery tray.
I studied the workshop manual and finally worked out the adjustment method, there are two ways to achieve this, one involves removing the floor console completely and using an U shaped piece of steel with one of the U legs being much shorter than the other. It needs to be about 4.5mm diameter, you put the gearbox in 4th gear, the tool then slides into holes in the shifter mechanism to lock the shifter and selector actuators in position. Once done head over to the gearbox end and release the cables from the box, slide the spring down the cable and pop out the pink clip leaving the cable adjustment completely loose, (easier to do if you press on the reverse side of the pink clip with a finger to release it) then just pop them onto their pins and press the pink clip in, slide the spring back over and job done.
The PDF shows the U shaped adjusment tool, in section 7 of the PDF.
The way I did it was to pop off the gear lever gaiter and use a 4.5mm drill bit to lock the lever into 4th gear position, I've attached a couple of pics to show what I mean. Then do the same procedure explained above with the cable end adjustment. The cable tie around the drill bit is in case I drop it.
The idea is that with the gearbox in 4th and the lever locked into 4th position the cables should be adjusted so the they drop onto the linkage without effort and then are locked into position.
I've now removed the forge shifter and reverted to the OEM linkage and the change has never been sweeter, the drill bit method takes minutes to do once you've exposed the gearbox cable ends by removing the battery, ECU and battery tray.
Attachments

Last edited:


