• Welcome to N-cars.net - the largest Hyundai N car forum. Check out the model specific sections below and scroll down for country specific forums. Scroll down for i30 N, Ioniq 5 N, i20 N, Veloster N and Kona N forums! Check out the i30 N Bible Here!

My i20N

Tuning Updates

In recent news it looks like Big Fish Garage have succeeded in copying Courtenay Sports homework and taken the Courtenay map of some customers car and duplicated it. Whilst this does seem a bit underhand I guess business is business and it’s certainly not illegal. What it might do is encourage Courtenay to push their unlocking of the ECU a step further as I have been told that more than 300 HP is possible from my car but that current ECU settings are blocking that….

In sunny Greece the Car Jackals are working on a fully forged and billet engine! I’m guessing this is to achieve 500 HP, or similar! Presumably they are intending to use a stand alone ECU but I’ve no idea. I’ve also no idea how they are going to get all that power to the road with a front wheel drive car - but I’m excited to find out!
 
  • Like
Reactions: PogueMahone
Cabin air filter has arrived. Here is a pic of it next to the genuine Hyundai part. The Bosch is this blue on the upside and on the other side it’s a pale grey - no idea why. Also, as you can see, the Bosch has fewer pleats in it… 🤷🏻‍♂️
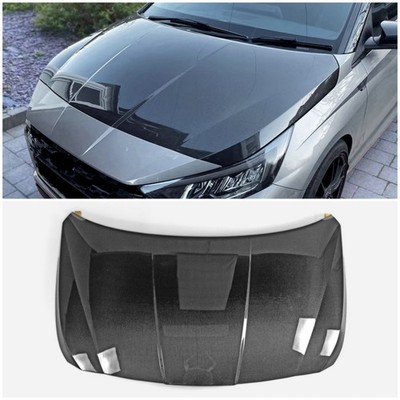
. It’s exactly the same size as the stock one though and fits fine.

IMG_8299.jpeg

I’ve just realised that the stock one looks a bit like the cover of Unknown Pleasures 🤣.
 
And here is a pic of the HVAC botch I did yesterday. I’ve left the tail on the cable tie in case I need to tighten it up a bit - it does look quite tight in the pictures but it’s actually quite loose. In the picture access doesn’t look too bad - but it bloody well is 😆. If you attempt this you will need long nose pliers or child like hands.

IMG_8303.jpeg
 
I believe the cable tie method was the official fix from hyundai too
Was it! Do you know if they also suggest drilling the hole I did and, if they did, how they recommended doing it? Without the hole I think it’s unlikely the cable tie would stay in place.
 
Not sure if they also did a hole, just remember a FB post where someone went multiple times for it to be clipped back and they had a tech bulletin and then when the owner checked it was a cable tie
 
  • Like
Reactions: YNWaN
I do remember a Facebook post where someone was complaining that the garage had fixed theirs with a cable tie - but really I can’t see any other way short of removing the dash. You can’t get behind the linkage to fit a screw or a nut.
 
It works better than it being held on with hopes and dreams like it did from the factory
 
  • Like
Reactions: YNWaN
Look what I found - I guarantee this is the bonnet I bought for less than half the price advertised as that is my car in the pictures 😆.

 
You can probably report the listing for your image? ebays changed a lot since i sold on there
 
You can probably report the listing for your image? ebays changed a lot since i sold on there
No, the seller is the same company I bought mine from and I gave them permission to use the picture as long as my registration was obscured - which it is. I just thought it funny that the same bonnet is now £2K on eBay when you can get it direct for £700.00. I strongly suspect this is true for a great many body kits and aftermarket parts.
 
  • Like
Reactions: PogueMahone
Ah well, i misunderstood then.

The mark up is most likely to allow for the fees incurred and maybe on their own books they can hide the purchase from taxes and such 😅
 
Today’s update - I’m not sure I have mentioned this but I’ve recently been experiencing a problem with the rear parking sensors. I’ll put the car in reverse and get this message on the dash:

IMG_8276.jpeg

Apparently you can test if the sensors are working by listening to them when they are supposed to be working - working ones make a high pitched whine noise. As I have a stethoscope (because of course I do 😆) I’ve had a listen and the furthest passenger side one appears to be dead. So I’ve taken it to my local dealer and hopefully they will be able to fix it…..
But… the sensors come pre-painted in whatever colour the car is and mine is extremely uncommon - even in base i20 spec, so if it needs replacing I hope it isn’t too difficult to get hold of.
 
  • Like
Reactions: frenchy2475
Today’s update - I’m not sure I have mentioned this but I’ve recently been experiencing a problem with the rear parking sensors. I’ll put the car in reverse and get this message on the dash:

View attachment 27616

Apparently you can test if the sensors are working by listening to them when they are supposed to be working - working ones make a high pitched whine noise. As I have a stethoscope (because of course I do 😆) I’ve had a listen and the furthest passenger side one appears to be dead. So I’ve taken it to my local dealer and hopefully they will be able to fix it…..
But… the sensors come pre-painted in whatever colour the car is and mine is extremely uncommon - even in base i20 spec, so if it needs replacing I hope it isn’t too difficult to get hold of.

99310Q0000R3W I recon :)


99310Q0000R3W I recon :)

Well…. It’s already back home - the dealer rushed it through and they have swopped over the sensors (two of them) and confirmed my previous diagnosis. Thankfully they have also concluded this will be covered by the warranty as the invoice shows a cost of £425.04!

Now I did have a look at the price of these sensors and you can get them used for £35.00. Even new ones are about £120 I think. The quote also mentions that the replacement will need to be painted - except you buy them pre-painted in the colour you require….

Anyway, it’s going to take about a week to arrive and is an easy job to fit as it just plugs into the loom and clips into the bumper.

Edit: I’ve just checked and it’s £133.99 for a genuine Hyundai part in the correct colour (Frenchy’s code is spot on 👍).
 
Update on my speaker upgrade:

So I’ve managed to make some big progress on my speaker upgrade. As you may know, I already have a heavily upgraded audio system in the car but I/we (my mate Dave and I) have discovered the tweeter and the mid/bass don’t completely meet. One solution is a three-way system but that would mean getting another amp and DSP and also quite a bit of wiring and surgery. So instead I’ve decided to go for replacing the tweeter with a small mid that can also reach high enough to perform as a tweeter.

These are my existing tweeters in custom sail panel builds:

IMG_8289.jpeg

These are bits for the new build: 1/ The original tweeters you get in the non Bose system, 2/ One of the new Helix drive units, 3/ A 3D printed ring with threaded inserts to hold the new drive units, 4/ The stock sail panel - I’ve cut a big hole in it and scuffed it up to take the glue and paint. I’ve started to position the mounting ring using bamboo skewers and hot glue.

IMG_8288.jpeg

I made a mock speaker jig to hold a laser pointer and used this to aim the drive units accurately. Then I’ve created a structure with more bamboo sticks. This will then be reinforced with glass fibre reinforced filler and then finish filler.

IMG_8312.jpeg

Here the mounting ring is being adjusted to point in the correct direction:

IMG_8310.jpeg

The passenger side being set up - the small hole is for the laser pointer to fit into. Both drive units will point at the centre of the drivers head. Still a lot of work to do….

IMG_8311.jpeg
 
Earlier today I did a mod that has been outstanding for some time - the Airtec torque mount (lower engine mount). This is very nicely made from billet aluminium and entirely replaces the existing mount. I have previously changed the bushes to Powerflex Purple and the to Powerflex Black - now the whole mount to the Airtec one.

But there was one simple problem that turned into a major hurdle when it came to fitting and one single washer was entirely to blame. The fitting of this washer isn’t shown in the Airtec instructions and no wonder as it’s extremely (almost impossible) to fit!

so these are the bits you get and I’ve highlighted the guilty washer:

IMG_2844.jpeg

and this is where the washer is supposed to fit:

IMG_2845.jpeg

so the washer is supposed to fit between the bushing and the bracket. Sounds easy but the whole lot is a super tight fit in the U bracket. You can’t flex the bracket because it’s 3mm steel so you have to struggle and swear and struggle etc. until you can align the hole in the bracket with the hole in the washer and the hole in the torque mount!


IMG_2846.jpeg

all the rest is really nicely made and thought through but this one aspect is badly realised and feels like an afterthought as all other bushings and caps are retained and avoid this major alignment headache.

As for how it performs we shall have to see. Its design means it’s inherently much stiffer than the stock item irrespective of what bushes are fitted. It certainly transmits as much vibration* as the black bushes I previously used so this s a mod for those who are quite committed. The real test is how it improves front end grip and I haven’t had a chance to test that yet - I’ll report back in the next few days.

* When I say it transmits as much vibration as the black bushings it should be taken into account that I am also running Powerflex Black bushes for the top engine mount and the gearbox mount.
 
Last edited: