It is the one that goes straight down. You either need a long, and I mean longer than a standard Halfords one, posidrive screwdriver, or you can get a ratchet spanner direct on the hex head off the adjuster. It's a long time ago I did mine so can't remember the size.Hello. If this headlight refers to I20N, Then which screw of them adjusts the hight of the high beem please?

-
Welcome to N-cars.net - the largest Hyundai N car forum. Check out the model specific sections below and scroll down for country specific forums. Scroll down for i30 N, Ioniq 5 N, i20 N, Veloster N and Kona N forums! Check out the i30 N Bible Here!
I20N headlights
- Thread starter tc222
- Start date
You are using an out of date browser. It may not display this or other websites correctly.
You should upgrade or use an alternative browser.
You should upgrade or use an alternative browser.

The screw is hidden behind the metal plate on the back of the headlight. The metal plate is secured by a screw. Undo the screw just enough for you to be able to flip the plate out of the way.Hello. If this headlight refers to I20N, Then which screw of them adjusts the hight of the high beem please?

Thank you for your answer frenchy2475.The screw is hidden behind the metal plate on the back of the headlight. The metal plate is secured by a screw. Undo the screw just enough for you to be able to flip the plate out of the way.
I took a picture for you to check the right screw for me please.
So if I get it right i have to unscrew the srew pointed by the blue arrow and afterwards remove the metallic tablet to
be ablle to reach the screw pointed with the red arrow?

Yes exactly thatThank you for your answer frenchy2475.
I took a picture for you to check the right screw for me please.
So if I get it right i have to unscrew the srew pointed by the blue arrow and afterwards remove the metallic tablet to
be ablle to reach the screw pointed with the red arrow?
View attachment 26065

Frenchy you are the one!!!Yes exactly that
Many many thanks!!!
No problem, will give you much more long range. I don’t think the lights are as bad as people make out. They just need correctly adjusting. I have driven cars with much poorer lights.Frenchy you are the one!!!
Many many thanks!!!

Yes, i do think so too.No problem, will give you much more long range. I don’t think the lights are as bad as people make out. They just need correctly adjusting. I have driven cars with much poorer lights.
The lights are good by design, i believe it's all about adjustments to work properly.
I will give you feedback as soon as possible.
Thanks again frenchy!
That adjusts the dip beam only. The main beam is harder to get to and hidden by the cover plate you can see in the post above.It is the one that goes straight down. You either need a long, and I mean longer than a standard Halfords one, posidrive screwdriver, or you can get a ratchet spanner direct on the hex head off the adjuster. It's a long time ago I did mine so can't remember the size.
You would think, given the trouble they've gone to hiding it, that it would have been accurately set at the factory but mine was so low it was dangerous. Now it's perfect but only because I did it myself. The Hyundai service department was clueless and could only mess with the dip beam trying to get it as high as possible to compensate.
Last edited:


The plate is guide for the screw driver so it engages in the adjuster and does not just twist out. I suspect the fact it covers the other screw is just a byproduct of it's primary function.

There are 2 metal plates and both of them are now in the glove box with the 2 screws in case the next owner is a must have everything original fanatic. They were such a pain to get off they certainly weren't going back on and the alignment is perfect now.

I don’t think those instructions relate to the i20N as they refer to removable headlight bulbs and they are not removable on the i20N.
Wow, Salty for one year on!
If you weren't so busy tyring to be clever, you might note that the i20N manual has all the details in for the LED headlights, the adjustments and the the heights to be set at.
From the factory, mine were set very low and nowhere near where the manual advised. Also, if you actually set them to the height shown in the manual, most drivers coming the other way will flash that you are dazzling them. So they either need to be set slightly lower or drip them down to 1 on the beam level adjustment within the car.
I tell you what, this is a very confusing thread as there seems to be a lot of contradictory information from well meaning contributors!
So, regarding my i20N, if I want to adjust the dipped beam to be a bit higher (not the full beam) do I adjust the knurled wheel (the one that also has a nut head) or a posidrive and move these little plates mentioned above?
So, regarding my i20N, if I want to adjust the dipped beam to be a bit higher (not the full beam) do I adjust the knurled wheel (the one that also has a nut head) or a posidrive and move these little plates mentioned above?
Last edited:
I tell you what, this is a very confusing thread as there seems to be a lot of contradictory information from well meaning contributors!
So, regarding my i20N, if I want to adjust the dipped beam to be a bit higher (not the full beam) do I adjust the knurled wheel (the one that also has a hut head) or a posidrive and move these little plates mentioned above?
Dipped beam can be adjusted from the top using a posidrive. To adjust the high beams only you need to move the metal plate out of the way. I used a tiny ratchet with a posidrive screwdriver head attached to it to make the adjustment.
Oh, you mean an extra long posidrive? Thank youDipped beam can be adjusted from the top using a posidrive. To adjust the high beams only you need to move the metal plate out of the way. I used a tiny ratchet with a posidrive screwdriver head attached to it to make the adjustment.
 . Are we talking three full turns kind of adjustment?
When I did mine I marked the existing setting on a vertical surface to show the upper dip cut offs and the centre of the high beams. Then I reset the dip beam cut offs to the correct height for the road which was largely trial and error but you need it to be as high as possible without the chance of dazzling anyone which is about headlight level. Since both beams are on with high beam you then need to set the high beam to fill everything above that upper cut off. So go a bit higher using the vertical surface template and then drop them until they just touch those dip upper cut offs without any gaps.Oh, you mean an extra long posidrive? Thank you
After that mine is now perfect.
Hi everyone,
I wanted to share my experience after having been following this thread for a while in order to get a clue on how to properly improve my headlights as my 2023 I20N had both right low and high beams really crossed to the center from the factory and driving at night for fun was unsafe.
As I didn't have long screwdrivers to get to the adjustment from the holes marked on the headlights’ top covers, just as the colleagues mentioned I had to do it from behind the headlights with a 13mm socket, and the small wrench and the flat 13mm key for the right headlight as the coolant reservoir leaves a small gap.
So, what I needed was to rise left and right low and high beams and open both, mainly the right one, to get a nice long range plus a wide enough vision.
I will attach pictures of the results I had.
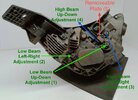
The adjustment is just turning the corresponding bolts for each thing (check the picture attached for reference) while having the car in front of a wall to see what you are doing.
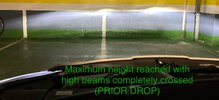
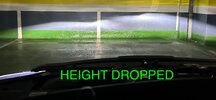
The main point of this post is to share with other owners that when adjusting the headlights, you can get a sudden drop in height if you force the lateral adjustment without a previous feeling of reaching a limit.
You might think that something got broken, as I did, but just undoing the lateral adjustment will allow you to recover the height adjustment lost on the sudden drop.
Then, for adjusting the low beam laterally you have to reach a bolt (2 in the picture attached) that is close to the inner part of the fender so it is really difficult to fit the wrench and be able to adjust it from the engine bay.
What I did was to steer the wheels and remove only the plastic pins from the front of the plastic wheel arch to be able to introduce the hand and place the small wrench to be able to adjust the (2) bolt from the picture attached.
Without long screwdrivers, it can be a bit difficult to reach all the adjustments from behind the headlights but with patience, it can be done.
Attached are some pictures of the process.
Sorry for the long post but I wanted to express everything without missing any detail as I hope to be helpful for others.
✌
I wanted to share my experience after having been following this thread for a while in order to get a clue on how to properly improve my headlights as my 2023 I20N had both right low and high beams really crossed to the center from the factory and driving at night for fun was unsafe.
As I didn't have long screwdrivers to get to the adjustment from the holes marked on the headlights’ top covers, just as the colleagues mentioned I had to do it from behind the headlights with a 13mm socket, and the small wrench and the flat 13mm key for the right headlight as the coolant reservoir leaves a small gap.
So, what I needed was to rise left and right low and high beams and open both, mainly the right one, to get a nice long range plus a wide enough vision.
I will attach pictures of the results I had.
The adjustment is just turning the corresponding bolts for each thing (check the picture attached for reference) while having the car in front of a wall to see what you are doing.
The main point of this post is to share with other owners that when adjusting the headlights, you can get a sudden drop in height if you force the lateral adjustment without a previous feeling of reaching a limit.
You might think that something got broken, as I did, but just undoing the lateral adjustment will allow you to recover the height adjustment lost on the sudden drop.
Then, for adjusting the low beam laterally you have to reach a bolt (2 in the picture attached) that is close to the inner part of the fender so it is really difficult to fit the wrench and be able to adjust it from the engine bay.
What I did was to steer the wheels and remove only the plastic pins from the front of the plastic wheel arch to be able to introduce the hand and place the small wrench to be able to adjust the (2) bolt from the picture attached.
Without long screwdrivers, it can be a bit difficult to reach all the adjustments from behind the headlights but with patience, it can be done.
Attached are some pictures of the process.
Sorry for the long post but I wanted to express everything without missing any detail as I hope to be helpful for others.
✌
Attachments