So, I finally got around to buying and fitting a dashcam in my car. I've owned the car for over a year but I felt the dashcam system I wanted was always overpriced so I was happy to wait for the inevitable reduction. The recent Amazon Prime day saw just such a reduction and the price dropped to something far more agreeable.
I've seen a lot of dashcam installation questions but not much in the way of guides so I thought I'd post my experiences.
This is in no way intended to be a tutorial, this is simply how I tackled the installation. All references are to a UK car, overseas models may differ. Any installation is at your own risk (but its actually quite straightforward).
This is the dashcam I opted for:

The Viofo A139 Pro 2 channel camera (2 channel just means I get a rear facing camera that records from the back). More info here (no affiliation whatsoever): Viofo 4K A139 Pro 2ch. I also bought the dedicated hardwire kit and a cheapo fuse tap. BTW, for those that don't know, the i20N uses Micro 2 sized fuses.
A quick note about the hardwire kit. There are many kits on the market that would do an equally good job at a lesser price. I have hardwired Viofo cams before on other cars and their kits have a voltage shut off protector built in. They have a voltage selector switch with a range from 11.8V to 12.4V. This means if you enable 'parking mode' on the cam, the cam will switch off if the voltage drops below what you select on the switch. DO NOT set the voltage to less than 12V. If you do this, you risk flattening your battery and not having enough charge to start the car. I always leave mine on the highest setting (12.4V), but the choice is yours. You have been warned. Also, make sure the hardwire kit has 3 cables if you want parking mode to work.

Another quick point with the hardwire kit. If you decide to go with an alternative kit, note the orientation of the USB-C (or Micro) plug. Many have a 90° outlet. This is fine depending on your choice of dashcam, but the A139 has the power input on the top of the unit so ideally needs a straight USB-C cable, especially if you want a neat install. If you're not bothered about tidy cables, then the choice is yours but consider the routing and the fact that the cable might have to bend back on itself in order to tuck around the headliner.
This image is the top of the dashcam I bought. You can see why a straight USB-C is preferential, along with the issues a 90° cable might bring:

So, to the installation itself.
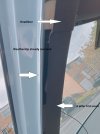
The camera sits behind the rear view mirror, positioned so the power cable has a straight run between the mirror mount and the rain sensor:

The only slightly awkward bit was tucking the choke on the USB cable under the headlining. If you look at the image above, you can see a very small bump to the right of where the cable disappears. It is 100% not noticeable when you're sitting in the car. The cover for the rain sensor just pulls off so the cable runs through the headliner, above the wiring for the sensor, then past the next sensor cover (not sure what it is, but that cover unclips easily as well), and goes over to the A pillar. Once you reach the A pillar trim panel you can pull the top of it away so you can route the cable into the weather strip. You'll have to pull the weather strip down to make enough room for the cable to go behind the A pillar trim. The cable then runs down behind the weather strip and into the fuse box behind the panel at the bottom of the drivers footwell:

Here you can see the weather strip pulled back and the cable disappearing into the fuse box:

Wiring to the fuse box was very simple.

There are 2 empty fuse locations on the box. The one circled top left provides constant power, and the top right is powered on ignition or ACC. So, main power is to the ACC (top right) location, if you want parking mode enabled then this is the top left. From memory, power comes in from the left so bear this in mind when you plug in your taps. Power has to come in, flow through the fuse, then go to your camera. This is how it looks after the fuse taps are installed:

I cable tied the excess and tucked it to the left of the fuse board out of sight. The grounding point I used was a bit of a pain. There is a random nut welded high up to the right of the fuse box. This was the only semi-convenient grounding point I could see. The 2 bolts above are NOT grounded, unfortunately. Unless you have tiny hands, the only way to access this nut is to remove this panel:

It was a bit reluctant to come off but once removed, you have full access to the nut. Start by prying it off gradually and once you can get a finger underneath it'll pop off. The thread is M6 so I found a nut in my stash to attach the ground:

Either side of the nut would be OK to attach the ground, I just chose the inside.
I'm limited to 10 photos per post so have not posted anything relating to the rear mounted camera. If anyone would like a similar rambling post on how I installed this then please let me know.
In the meantime, hopefully this might give someone a few pointers. Any questions, please let me know and I'll do my best to answer. I am NOT a qualified installer/auto electrician but this is really not a difficult job to do and is made much simpler by having 2 spare locations on the fuse box. There's always concern over which fuses to tap into so this takes away any guesswork.
Good luck .
.
I've seen a lot of dashcam installation questions but not much in the way of guides so I thought I'd post my experiences.
This is in no way intended to be a tutorial, this is simply how I tackled the installation. All references are to a UK car, overseas models may differ. Any installation is at your own risk (but its actually quite straightforward).
This is the dashcam I opted for:
The Viofo A139 Pro 2 channel camera (2 channel just means I get a rear facing camera that records from the back). More info here (no affiliation whatsoever): Viofo 4K A139 Pro 2ch. I also bought the dedicated hardwire kit and a cheapo fuse tap. BTW, for those that don't know, the i20N uses Micro 2 sized fuses.
A quick note about the hardwire kit. There are many kits on the market that would do an equally good job at a lesser price. I have hardwired Viofo cams before on other cars and their kits have a voltage shut off protector built in. They have a voltage selector switch with a range from 11.8V to 12.4V. This means if you enable 'parking mode' on the cam, the cam will switch off if the voltage drops below what you select on the switch. DO NOT set the voltage to less than 12V. If you do this, you risk flattening your battery and not having enough charge to start the car. I always leave mine on the highest setting (12.4V), but the choice is yours. You have been warned. Also, make sure the hardwire kit has 3 cables if you want parking mode to work.
Another quick point with the hardwire kit. If you decide to go with an alternative kit, note the orientation of the USB-C (or Micro) plug. Many have a 90° outlet. This is fine depending on your choice of dashcam, but the A139 has the power input on the top of the unit so ideally needs a straight USB-C cable, especially if you want a neat install. If you're not bothered about tidy cables, then the choice is yours but consider the routing and the fact that the cable might have to bend back on itself in order to tuck around the headliner.
This image is the top of the dashcam I bought. You can see why a straight USB-C is preferential, along with the issues a 90° cable might bring:
So, to the installation itself.
The camera sits behind the rear view mirror, positioned so the power cable has a straight run between the mirror mount and the rain sensor:
The only slightly awkward bit was tucking the choke on the USB cable under the headlining. If you look at the image above, you can see a very small bump to the right of where the cable disappears. It is 100% not noticeable when you're sitting in the car. The cover for the rain sensor just pulls off so the cable runs through the headliner, above the wiring for the sensor, then past the next sensor cover (not sure what it is, but that cover unclips easily as well), and goes over to the A pillar. Once you reach the A pillar trim panel you can pull the top of it away so you can route the cable into the weather strip. You'll have to pull the weather strip down to make enough room for the cable to go behind the A pillar trim. The cable then runs down behind the weather strip and into the fuse box behind the panel at the bottom of the drivers footwell:
Here you can see the weather strip pulled back and the cable disappearing into the fuse box:
Wiring to the fuse box was very simple.
There are 2 empty fuse locations on the box. The one circled top left provides constant power, and the top right is powered on ignition or ACC. So, main power is to the ACC (top right) location, if you want parking mode enabled then this is the top left. From memory, power comes in from the left so bear this in mind when you plug in your taps. Power has to come in, flow through the fuse, then go to your camera. This is how it looks after the fuse taps are installed:
I cable tied the excess and tucked it to the left of the fuse board out of sight. The grounding point I used was a bit of a pain. There is a random nut welded high up to the right of the fuse box. This was the only semi-convenient grounding point I could see. The 2 bolts above are NOT grounded, unfortunately. Unless you have tiny hands, the only way to access this nut is to remove this panel:
It was a bit reluctant to come off but once removed, you have full access to the nut. Start by prying it off gradually and once you can get a finger underneath it'll pop off. The thread is M6 so I found a nut in my stash to attach the ground:
Either side of the nut would be OK to attach the ground, I just chose the inside.
I'm limited to 10 photos per post so have not posted anything relating to the rear mounted camera. If anyone would like a similar rambling post on how I installed this then please let me know.
In the meantime, hopefully this might give someone a few pointers. Any questions, please let me know and I'll do my best to answer. I am NOT a qualified installer/auto electrician but this is really not a difficult job to do and is made much simpler by having 2 spare locations on the fuse box. There's always concern over which fuses to tap into so this takes away any guesswork.
Good luck
.
Last edited:


 :
: