• Welcome to N-cars.net - the largest Hyundai N car forum. Check out the model specific sections below and scroll down for country specific forums. Scroll down for i30 N, Ioniq 5 N, i20 N, Veloster N and Kona N forums! Check out the i30 N Bible Here!

P0LYtek's Slushy

P0LYtek

Member
Nthusiast
Sep 18, 2024
30
19
8
Germany
Hi Guys,
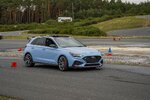
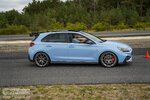
this is Slushy, my manual 2023 i30 N Performance.
Car's detailDescription
NameSlushy
Typei30N Performance FL
  • Sunroof
  • N-Light Bucketseats
Price paid33,500€
ColorPerformance Blue
Production dateNovember 2022
Pickup dateAugust 1st 2024
Pickup milage24.600 km
Current milage55.200

IMG_20250424_083537803_HDR.jpg

I'm 1.95m large & have shoe size EU 48, which limited the available sportier cars for me by a lot. Just for fun i tried to sit in a i30 N and i actually fit! The one i tried already had a panoramic sunroof and the bucket seats, so i was amazed by the headspace (read: not hitting my head even with the sunroof). I quickly looked for one that was also manual and Performance Blue, because there are too many cars already driving around in just Black, Grey & White and bought Slushy used 2 Years ago.

Mods​

PartProduct - PriceDescription
Air IntakeOEM / Pipercross Open Air Intake (used) - 650 EURMust-Have for the sound:D
Summer Rims
Winter Wheels
TEC Speedwheels GT6 Evo HyperBlack - 910 EUR
Winguard Sport 2 XL M+S - 662 EUR
Post in Rims Database
Shift KnobBilletworkz VelosterN Short Teardrop - 160 EUR (incl. Import)Post in here
Dash CamDDPAI Mola N3 PRO + Hardwire Kit - 40 EUR<Post coming>
SpoilerCSR Swan Neck Wing - 1.600 EUR (painted)Post in here
 
Last edited:
  • Love
Reactions: Dream Making

Future Projects​

I'm just gonna dump all my ideas here and update it from time to time. Lets see what will really happen and what i just like to think about.
Part / ProjectOptionsDescription
Front LipCSR CSL714+ Not too low, higher approach angle
+ I've heard about the front bumper getting loose below the grille,
so not having much of a splitter there could help
- Not extending to the side
SpeedEngineering Speed+ Lip+ Aggressive!
- much lower approach angle
- more expensive
DiffusorCT Carbon DiffusorHard to get TÜV approval or any german documents for. The Carbon finish doesn't really fit there but the styling is great.
Maxton / Ingo-Noak ExtensionIt's not that spectacular, but not bad either.
Exhaust TipsIf the Diffusor is larger, the exhaust tips need to poke out a bit too.
"Feel"Powerflex Yellow / Purple BushingsI have some wheelhop, but not too much. As i sometimes prefer a softer ride (especially driving on the Autobahn for 6h 130 km/h) i fear the purple one is a bit too much for me
Powerflex Shift Linkage BushingsHeard some good stuff about it, better shift feel is always appreciated.
Forge / Bomba Racing Short ShifterJust the Brackets. I can't really decide because i want the possibility to change the shortness, but also the offset the Bomba brings.
G-Tech Rear Cross BraceCan be painted in any RAL color, could help with even less noises from the panoramic roof (even though it isn't too bad now)
Hood VentsSpeedEngineering Universal Vents+ The cheapest option
SJ Exclusive Carbon Hood+ Unique & Beautiful
-- Expensive! & probably needs to be painted
-- Seen some 2 Year old that are already cracking etc.
InteriorWST Carbon Dashboard / DIYAlternative is just to DIY the carbon skinning. I've never done this before, but have experience with Resin
Cooling SeatsThe new Ioniq 6 N has the N Bucket seats with cooling. I wonder if one could switch the seats...
Otherwise some companies offer this + upholstering the bucket seats with fake carbon leather in the rear would look great too. The fake leather is already starting to disintegrate.
Lower Grille"N Performance" LetteringAs the 3D-Printed stuff isn't so "TÜV Konform" i am wondering if i could replace the OEM mesh with a finer mesh & spray paint the lettering on it simmilar to TCR / Rally car grills
PerformanceG-Tech Flex PipeThe limiting factor of the exhaust system.. This should be a great preparation for a tune later
Wagner / Boost Town IntercoolerThe Wagner is tried & tested, the BoostTown has a ABE and is quite new...
 
Last edited:
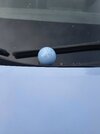
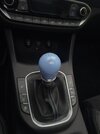
I was quite disappointed with the OEM Shift knob. It is small, light and wasn't great quality wise. I always felt the hard cuts at the bottom of the light blue plastic inset when shifting forward.
The Veloster gearbox is near identical to the i30Ns, so you can just use Veloster stuff for your i30N and have much more options. Both Hyundais don't use a normal threaded knob and instead a kind of friction fit, which means either getting a custom knob including adapter or changing the Shift rod to a shortshifter (something like what Boomba Racing offers).

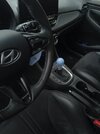
IMG_20260919_100001254_HDR.jpg IMG_20260924_170844780.jpg IMG_20260924_183357678.jpg
I decided to go with the knob and adapter from Billetworkz for the Veloster N (Short Teardrop, Performance Blue, korean Lettering). It does fit the Car quite nice, the color is close enough for the interior and the reverse lockout sits flush with the knob when pulled up. It feels way better to shift now with the added weight and (for me) improved shape.

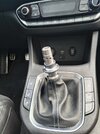
IMG_20260919_100034534_HDR.jpg
The adapter needs a allen key in size 3/32", but doesn't come with one, so if you're not from America you need to order a single allen key online...
You can change the Shift knob with any other Billetworkz knob or get one with a thread of 3/4-16.
 
Last edited:
I wanted a spoiler that would be easy to spot, but not full-on racecar-style. My options right from the start were:
  • a small spoiler cap, like the one by Maxton or Zaero, which for me were too small and looking from the side not noticeable enough
  • the Zymexx Ducktail spoiler, which is harder to get and tbh i just didn’t like the way it fit with the bodylines of the car
  • the TCR-Style spoiler from Speed Engineering, which is a bit much for a street car
But then CSR released its Swan Neck Wing for the hatchback, which is clamped onto the OEM spoiler and for me this was the perfect mix. I ordered it painted (was available for ~300 EUR more) as this was cheaper & faster than going to a painter myself. Unpainted Fiberglass needs to be prepped thoroughly before painting, so it's lots of work before being able to get painted you have to pay.
slushy1.jpg slushy2.jpg​
At first I wasn't sure about the quality, but after 6 Months it does hold up perfectly fine and still looks great. The hatch is a bit heavier and closes faster, so be a bit more mindful about that, but overall I’m really happy with the spoiler. You always have a bit of a gap between OEM spoiler & wing, but it's barely noticable unless you are actively looking for it.
Problem now is just: I need more "aero" to match the wing :D

German install video
I probably needed like 3 hours or so. You’ll need additionally:
  • a bike torque wrench (5nm)
  • a bit of PPF (to protect the OEM spoiler where the wing clamps onto it)
  • Sponge rubber strips (you will cut the oem ones)
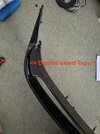
  • Double sided foam tape
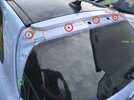
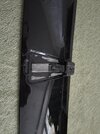
IMG_20260621_093834764.jpgFirst you need to remove the OEM spoiler by removing 5 screws inside the hatch. Then remove the 2 clips at the bottom holding it onto the hatch (tough to grab, but it's a bit easier when pulling to the rear). Pull the wiper spray line and unplug the 3rd brake light. Lifting the spoiler is a 2 person job, as the whole assembly is under tension and removing one side first lets the whole thing spring and hit the bare hatch metal with its studs and you have to seal the paint again so it doesn’t rust (don’t ask me how i know).

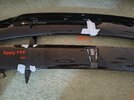
Now you can split the top & bottom parts by removing the 3 black screws at the bottom, cutting the rubber strips and cutting the double sided tape at 3 points. If you are careful you could probably reuse the tape.
Assemble the wing and the top holds loosely, mark the center of the wing and align it with the center of the upper OEM spoiler. Mark where the clamps will touch the spoiler and apply some PPF so it fully goes around the upper OEM spoiler, but is not as wide as the wing clamps.
IMG_20260621_095205951_HDR.jpg IMG_20260621_095433697_HDR.jpg IMG_20260621_103443269_HDR.jpg​
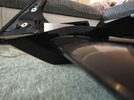
Sandwich the upper spoiler with the second pair of holds and tighten the first screws to exactly 5 NM (nothing more!). Yes, the clamps do not close the gap to the OEM spoiler completely, but they will hold.
IMG_20260621_104950649.jpg​
Now you can apply PPF to the lower spoiler roughly where the clamps will touch the plastic. Reapply the double sided tape if needed and screw the 2 OEM spoiler parts back together. Then you can use the rubber strips to back-up the seal you cut earlier and make the top part a bit more waterproof. After the picture i added another line of rubber strip behind the cut one.
IMG_20260621_114351552_HDR.jpg​
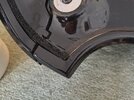
After that attach and screw in the last part of the clamps (5NM The aluminum clamps are soft!) and stick on the 3M Tape. The hard part is now to attach the spoiler back to the car without sticking the 3M Tape to the glass first. When inserting the screws back into the hatch try to hold the wing up with force by the clamps. I needed to use fishing wire to remove and properly place the clamps again so I could screw the spoiler back into the hatch.
After all that you can properly tighten the 4 wing screws to 5 NM (exactly!) and you’re done! If the screws don’t hold anymore or don’t reach the 5 NM anymore, you need to use helicoils and re-drill the holes a bit wider. Then the screws should hold a bit more though.
 
  • Like
Reactions: Bu11eT