
The gearchange in the I30N is very sensitive to cable adjustment, Here is the method to use if you're experiencing
notchy or difficult changes.
You need to access both ends of the cables and to do this you will need 10mm and 12mm sockets and extensions, along with a ratchet.
Remove the battery, disconnect the -ve lead first, put an old glove or sock over it to prevent it dropping forward and touching the battery and also to stop it damaging the paintwork.
Then remove the positive lead, once done use the 12mm socket and extension to loosen and remove the clamp holding the front of the battery.
Slide the battery a few mm forward and lift out of the car using the handles, take care here as it's pretty heavy.
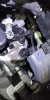
Next pull up the cable retainers on the ECU and move out of the way, using a 10mm socket remove 3 bolts and the cable clip on the connection to the inner wing, lift the ECU away, put it somewhere safe and don't tread on it!
Next remove the battery tray, it's 3 x 12mm bolts and one 10mm holding the airbox to the tray, there's also 2 x 10mm bolts holding the +ve battery harness.
Tip the tray to one side to allow the battery harness retainers to slide out of the tray.
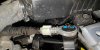
Now you can see the gearchange cable ends. The one nearest the front of the car is the selector (side to side) actuator, the other one is the shifter (forward and back) actuator.
Now head inside the car and remove the gearchange gaiter, it's clipped in around the edges, 2 clips per side so 8 in all.Just choose a side ang dig you fingers in to the gaiter and move towards the middle.
If you can pull off the gearknob you're much stronger than me as I couldn't move it.
You should now see the base of the gearlever, next you need to get the surround with the buttons for the heated seats etc out of the way. It's held in by 4 push in clips, just lift from the rear and it will pop up.
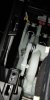
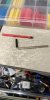
You should now have enough room for the next steps. For this you will need a 4.5mm drill bit or a bit of rod as well as a 4mm allen key.
I wrapped both in some heatshrink to enlarge them so that they fitted really snugly into the gear mechanism.
Put the car in 4th gear, use the drill bit to slide into the locating holes either side of the gearstick and through the hole at the base of the stick itself.
That's now locked the shifter mechanism, if you look down to the LHS of the gearstick you will see the selector actuator, there's a hole in it which lines up with a hole in the side of the gearshift mechanism, use the short part of the allen key L and push it through those holes, the selector is now fixed in position.
Head back to the engine bay and and slide the spring on the cable end towards the eye of the cable, you will see a pink retainer clip, feel the other side of this clip and push it so that it releases from the cable teeth, this allows the cable eye to loosen and settle in the correct position, push the clip back in and allow the spring to return to it's original position, do exactly the same with the other cable. That's the adjustment carried out.
Another method would be to do this..
You can also pull the R clip out of the cable end and lift the eye off the pin, release the pink clip so that the eye is free and whilst it is still free drop it back onto the pin, lock it in position. Repeat for the other cable, you're now all adjusted.
Remove the drill bit and allen key from the gearstick and press the clutch and try the changes.
This is the Hyundai recommended method of adjusting the cables and all new gearshift mechanisms come with a tool to do exactly that, I've just substituted this tool with a drill bit and an allen key.
It cured all of the notchiness I had going into 2nd, 4th and 6th gear and I think is particularly relevant to cars outside the VIN range that had faulty 5/6 synchros.
I've attached the service bulletin about faulty syncromesh on early vehicles as well as pictures of the method I used to align the cables.
To summarise, the only method to adjust the cables correctly is to place both gearstick and transmission in 4th gear, lock the gearstick to prevent movement
and then free off the adjusters to allow them to settle into the new position and then lock them in that place.
notchy or difficult changes.
You need to access both ends of the cables and to do this you will need 10mm and 12mm sockets and extensions, along with a ratchet.
Remove the battery, disconnect the -ve lead first, put an old glove or sock over it to prevent it dropping forward and touching the battery and also to stop it damaging the paintwork.
Then remove the positive lead, once done use the 12mm socket and extension to loosen and remove the clamp holding the front of the battery.
Slide the battery a few mm forward and lift out of the car using the handles, take care here as it's pretty heavy.
Next pull up the cable retainers on the ECU and move out of the way, using a 10mm socket remove 3 bolts and the cable clip on the connection to the inner wing, lift the ECU away, put it somewhere safe and don't tread on it!
Next remove the battery tray, it's 3 x 12mm bolts and one 10mm holding the airbox to the tray, there's also 2 x 10mm bolts holding the +ve battery harness.
Tip the tray to one side to allow the battery harness retainers to slide out of the tray.
Now you can see the gearchange cable ends. The one nearest the front of the car is the selector (side to side) actuator, the other one is the shifter (forward and back) actuator.
Now head inside the car and remove the gearchange gaiter, it's clipped in around the edges, 2 clips per side so 8 in all.Just choose a side ang dig you fingers in to the gaiter and move towards the middle.
If you can pull off the gearknob you're much stronger than me as I couldn't move it.
You should now see the base of the gearlever, next you need to get the surround with the buttons for the heated seats etc out of the way. It's held in by 4 push in clips, just lift from the rear and it will pop up.
You should now have enough room for the next steps. For this you will need a 4.5mm drill bit or a bit of rod as well as a 4mm allen key.
I wrapped both in some heatshrink to enlarge them so that they fitted really snugly into the gear mechanism.
Put the car in 4th gear, use the drill bit to slide into the locating holes either side of the gearstick and through the hole at the base of the stick itself.
That's now locked the shifter mechanism, if you look down to the LHS of the gearstick you will see the selector actuator, there's a hole in it which lines up with a hole in the side of the gearshift mechanism, use the short part of the allen key L and push it through those holes, the selector is now fixed in position.
Head back to the engine bay and and slide the spring on the cable end towards the eye of the cable, you will see a pink retainer clip, feel the other side of this clip and push it so that it releases from the cable teeth, this allows the cable eye to loosen and settle in the correct position, push the clip back in and allow the spring to return to it's original position, do exactly the same with the other cable. That's the adjustment carried out.
Another method would be to do this..
You can also pull the R clip out of the cable end and lift the eye off the pin, release the pink clip so that the eye is free and whilst it is still free drop it back onto the pin, lock it in position. Repeat for the other cable, you're now all adjusted.
Remove the drill bit and allen key from the gearstick and press the clutch and try the changes.
This is the Hyundai recommended method of adjusting the cables and all new gearshift mechanisms come with a tool to do exactly that, I've just substituted this tool with a drill bit and an allen key.
It cured all of the notchiness I had going into 2nd, 4th and 6th gear and I think is particularly relevant to cars outside the VIN range that had faulty 5/6 synchros.
I've attached the service bulletin about faulty syncromesh on early vehicles as well as pictures of the method I used to align the cables.
To summarise, the only method to adjust the cables correctly is to place both gearstick and transmission in 4th gear, lock the gearstick to prevent movement
and then free off the adjusters to allow them to settle into the new position and then lock them in that place.
Attachments
-
 IMG_20200504_141138.jpg500.6 KB · Views: 1,201
 -
 IMG_20200504_141146.jpg405.6 KB · Views: 1,147
 -
 IMG_20200522_130150.jpg299.9 KB · Views: 1,117
 -
 IMG_20200522_130401.jpg247 KB · Views: 1,098
 -
 IMG_20200522_131945.jpg313.9 KB · Views: 1,113
 -
 IMG_20200522_142740.jpg423.1 KB · Views: 1,095
 -
floor console3.pdf423.9 KB · Views: 457
-
 rps20190107_214200.jpg73.1 KB · Views: 1,084
 -
gear lever control cable repair.pdf444.6 KB · Views: 423
-
gear control cables repair1.pdf570.5 KB · Views: 365
Last edited:


