
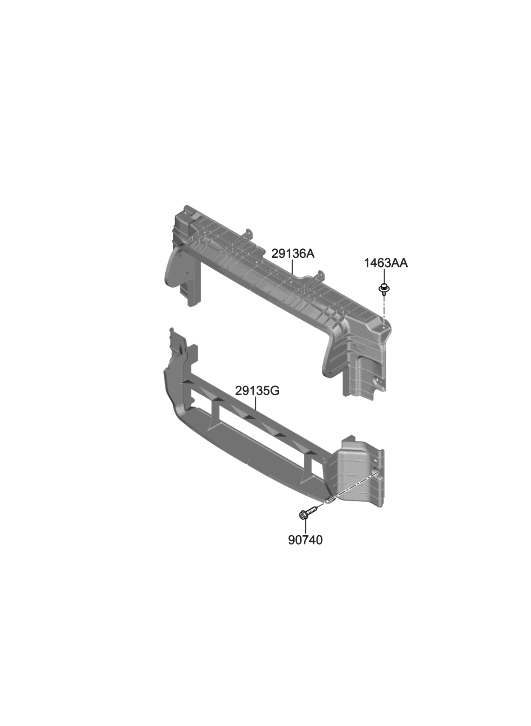
For those who are interested in how the cuts need to be made for the Upper Air Duct to accommodate the Velossa Tech Ram Air, this is what is should look like.


This will be the closest cut you can make for the air duct to fit around it and accommodate the VT Ram Air. On the front portion and left side, there will be adhesive backed foam weather stripping to help seal any gaps left from the cuts. Additionally the foam tape will be placed above the underside of the and on right to seal these gaps.
The Upper Air Duct can be had thru Hyundai Parts Deal for; $9.67. So, if you mess it up while making the cuts, you can afford to purchase another.
https://www.hyundaipartsdeal.com/genuine/hyundai-guard-air-radiator-upr~29135-k9100.html
Tools needed;
Dremel Tool w/cutting wheel
Dremel Sanding wheel
Coarse File
Fine File,
Medium Sponge Sanding Block
1000 Grit Wet/Dry Sand Paper.
Krylon Black Satin Primer & Paint
Silver Sharpie Marker
Adhesive Backed Weather Stripping 1/2"
These tools will allow you to make the fine cuts required and finish off the plastic cleanly. It's an easy job with the right tools and a steady hand. The idea is, to take just enough off leaving a little excess to finish off with the file sanding sponge and wet/dry paper. It best to slide the VTRA duct in and out for the appropriate fitting. Once you have it fitted flush to the screw hole in the left side it's ready to paint and remount.
The Dremel and cutting wheel makes fast work, set a a moderate speed. Don't try to hog out the entire piece in one go. Take your time and make the cuts without removing the cut plastic piece until the very end. Don't over shoot the cuts. Make them as close to the end as possible without over cutting the edge. If you have to use a small dry wall saw to remove the piece at each corner.
Once it's ready to refit, apply the adhesive backed weather stripping on the front and left sides where the flats are. Then apply the same stripping on the top underside and right side underneath the air duct leading edge. This will seal off the open areas on the plastic upper air duct.
Big thing here it to take your time and do it right. Don't make a hack job of it!
What you will have it a OEM looking setup that is neat and tidy.")

This will be the closest cut you can make for the air duct to fit around it and accommodate the VT Ram Air. On the front portion and left side, there will be adhesive backed foam weather stripping to help seal any gaps left from the cuts. Additionally the foam tape will be placed above the underside of the and on right to seal these gaps.
The Upper Air Duct can be had thru Hyundai Parts Deal for; $9.67. So, if you mess it up while making the cuts, you can afford to purchase another.
https://www.hyundaipartsdeal.com/genuine/hyundai-guard-air-radiator-upr~29135-k9100.html
Tools needed;
Dremel Tool w/cutting wheel
Dremel Sanding wheel
Coarse File
Fine File,
Medium Sponge Sanding Block
1000 Grit Wet/Dry Sand Paper.
Krylon Black Satin Primer & Paint
Silver Sharpie Marker
Adhesive Backed Weather Stripping 1/2"
These tools will allow you to make the fine cuts required and finish off the plastic cleanly. It's an easy job with the right tools and a steady hand. The idea is, to take just enough off leaving a little excess to finish off with the file sanding sponge and wet/dry paper. It best to slide the VTRA duct in and out for the appropriate fitting. Once you have it fitted flush to the screw hole in the left side it's ready to paint and remount.
The Dremel and cutting wheel makes fast work, set a a moderate speed. Don't try to hog out the entire piece in one go. Take your time and make the cuts without removing the cut plastic piece until the very end. Don't over shoot the cuts. Make them as close to the end as possible without over cutting the edge. If you have to use a small dry wall saw to remove the piece at each corner.
Once it's ready to refit, apply the adhesive backed weather stripping on the front and left sides where the flats are. Then apply the same stripping on the top underside and right side underneath the air duct leading edge. This will seal off the open areas on the plastic upper air duct.
Big thing here it to take your time and do it right. Don't make a hack job of it!
What you will have it a OEM looking setup that is neat and tidy.


