-
Welcome to N-cars.net - the largest Hyundai N car forum. Check out the model specific sections below and scroll down for country specific forums. Scroll down for i20 N, Kona N and Tuscon N forums! Check out the i30 N Bible Here!
You are using an out of date browser. It may not display this or other websites correctly.
You should upgrade or use an alternative browser.
You should upgrade or use an alternative browser.

M
Member left member 268
Guest
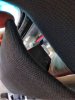
Yes it's easy.. just pull away the rubber trim round the top and side of door and firmly pull the A post trim away from the top... No need to remove the bottom end... Feed the wire underneath the front head lining and down the A post UNDERNEATH the airbag.
Remove the fuse box side panel... and front access panel... I also removed the complete front panel... Just three screws hold it... Two under the side panel and one underneath at the other end...and pull it off... Makes the job a lot more accessible.
Remove the fuse box side panel... and front access panel... I also removed the complete front panel... Just three screws hold it... Two under the side panel and one underneath at the other end...and pull it off... Makes the job a lot more accessible.
I bought the Nextbase hardwire kit but it doesn't contain a Micro2 fuse holder. Worth noting if you have a Nextbase cam and are planning on buying the kit to hardwire into an i30N. I called Nextbase and they offered to send me out a Micro2 holder and fuse for the dashcam at no cost.
View attachment 974
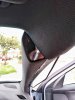
As I said, once the seal is off, just pull on the A-pillar trim and route underneath the airbag.
Once this is complete, you can clip the A-pillar trim back on.
Next to the side of the dash board.
View attachment 975
IGNORE THE MESS :/
View attachment 976
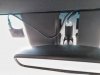
This trim just unclips, either use your fingernails, or a trim removal tool to take this cover off.
As you can see there are many bolts which you could use as an earth, ive gone for a 13mm bolt which goes directly into the chassis.
View attachment 977
Now the fun part, locate the spare 10amp fuse on the right hand side of the fusebox - I have tested this with a multi-meter and this is an ignition live, meaning this will only turn on when your ignition is on.
View attachment 978
View attachment 979
You will need a piggyback micro2 fuse holder which looks like so..
View attachment 980
Take out the original 10amp fuse and put this in the slot closest to the prongs and ive just used a 5amp micro2 fuse to keep the dash cam safe.
One this has been put in, test the camera to make sure it turns on with the ignition and jobs a goodun!
Tools Needed:
Wire Strippers/Pliers
Crimpers (Can use pliers if not)
Trim Removal Tool
20 minutes of your time.
EASY PEASY -
3/10 on the difficulty scale.
Which slot did you choose in the end
Genuinely just noticed that, may mess with my OCD slightly.. damn.
It doesn’t really matter that they are upside down, must have been how they installed at the factory, or on the alarm installation.
It doesn’t really matter that they are upside down, must have been how they installed at the factory, or on the alarm installation.
Genuinely just noticed that, may mess with my OCD slightly.. damn.
It doesn’t really matter that they are upside down, must have been how they installed at the factory, or on the alarm installation.
dam right not looked at mine but they will all be the same way before i even start lol, while your here the negative from the wiring was it the black bolt in the pic?
dam right not looked at mine but they will all be the same way before i even start lol, while your here the negative from the wiring was it the black bolt in the pic?
Correcto; as soon as you take that side panel off you can see it, best one as it’s right into the chassis.
Correcto; as soon as you take that side panel off you can see it, best one as it’s right into the chassis.
Thanks was not sure if the black bolt was painted, may attempt this tomorrow if the weather plays
Absolutely peeing it down! Not ideal.
Yeah not impressed wanted to do dash cam and 3d plates today....bah NE weather well still going out for a drive lol
Nice guide Dan very helpfull.
I went to install my Cam today, however didn't realize how hard it is to find Micro Blade 2 Fuse Taps in stores. I've tried all the Auto Elec places.
Seems they sell them but not in the Blade 2 size.
Sure there's other ways around it but I do like the Tap idea.
I've manage to find some on Ebay but really wanted to get the install done today. Ah well
Thanks for the guide, going to attempt this weekend as I'm sick of the sat nav cable flapping about. Couple of questions:
1) Are there any special techniques for getting the door seals out and in without damaging them?
2) My camera has a motion detection standby mode so will be good to keep it powered at all times, the hardwire kit has voltage detection so will cut out after the car batter drops below 11.6v which seems a bit low to me. Anyone think this is a bad idea?
I can answer point one, gentle tug the seal come out a track in the door and go back on the same way 30 sec max to pull them off carfully
M
Member left member 268
Guest
11.6v should be OK for summer although have mine set at 12V... .the other option being 12.5 v on mine.
Start by pulling the rubber away at the bottom of A post door radius... And pinch the channel tight in the rubber before refitting it.
Start by pulling the rubber away at the bottom of A post door radius... And pinch the channel tight in the rubber before refitting it.
The door seals and fairly robust just pull and they will slide off, I’ve fit hundreds of dash cams and have never damaged a door seal.
Thanks for the guide got it installed with no problems.
I pulled on the top of the A Piller to unclip the first clip, made it easier to carefully pass the wire under the air bag. A set of trim tools made it simple.
Attached some additional pictures in case it helps anyone
I pulled on the top of the A Piller to unclip the first clip, made it easier to carefully pass the wire under the air bag. A set of trim tools made it simple.
Attached some additional pictures in case it helps anyone
Attachments